

1. Shiro是什么?
shiro是Apache开源的Java安全框架。
引入shiro依赖。
<dependency>
    <groupId>org.apache.shiro</groupId>
    <artifactId>shiro-core</artifactId>
    <version>1.9.0</version>
</dependency>
2. Shiro中的关键对象
-
Subject:主体访问系统的用户,主体可以是用户、程序等,进行认证的都称为主体。
-
Principal:身份信息是主体经行身份认证的标识,标识必须具有唯一性,如用户名、手机号码、邮箱地址等。一个主体可以有多个身份,但是必须要有一个主身份(
Primary Principal)。 -
credential:凭证信息是只有主体自己知道的安全信息,如密码、证书等。
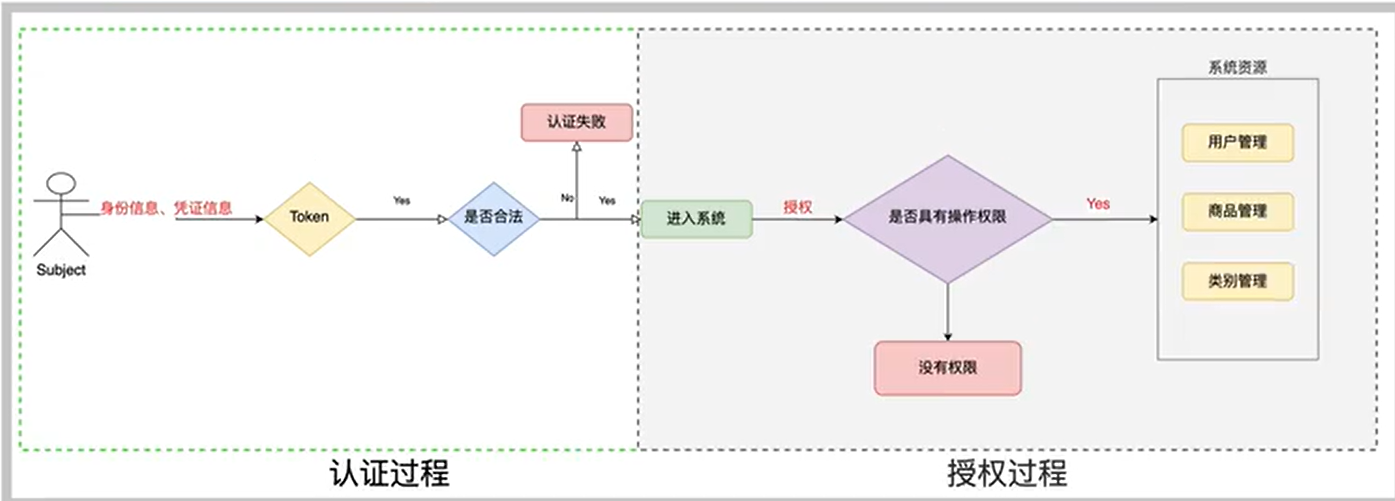
3. 认证流程

用户(主体)登录系统,填写用户名(身份信息),其中密码可以作为凭证信息,身份信息+凭证信息=Token,然后判断是否合法,合法则进入系统,否则认证失败。
4.认证源码分析
- 最终执行用户名的比较
SimpleAccountRealm类中的doGetAuthenticationInfo中完成用户名校验,之后会自动进行密码的校验,调用AuthenticatingRealm中的assertCredentialsMatch进行凭证认证。

总结:当我们需要做登录认证时,可以继承AuthorizingRealm类。因为AuthorizingRealm类继承了AuthenticatingRealm类,所有AuthorizingRealm类中的既有认证方法,也有授权方法,所以我们自定义Realm类时只需要继承AuthorizingRealm类即可,并重写里面的doGetAuthenticationInfo方法和doGetAuthorizationInfo方法。
简而言之:自定义Realm需要继承AuthorizingRealm类。
5.编写代码
1.使用shiro中的ini文件
shiro默认支持ini文件,ini文件用来存储数据,用于模拟数据库,方便入门学习,后期开发中不用编写ini文件。
- 在项目的
resources目录下创建ini文件。
[users]
zhangsan=123
lisi=456
xiaoming=123456
-
创建主类。
public class DemoShiroApplication {

    public static void main(String[] args) {
        // 1. 创建安全管理对象
        DefaultSecurityManager securityManager = new DefaultSecurityManager();
        // 2. 给安全管理器设置 realm
        securityManager.setRealm(new IniRealm("classpath:shiro.ini"));
        // 3. SecurityUtils 给全局安全工具类设置安全管理器
        SecurityUtils.setSecurityManager(securityManager);
        // 4. 关键对象 subject 主体
        Subject subject = SecurityUtils.getSubject();
        // 5. 创建令牌
        UsernamePasswordToken token = new UsernamePasswordToken("xiaoming", "123456");
        try {
            System.out.println("认证状态:" + subject.isAuthenticated());
            subject.login(token); // 用户认证
            System.out.println("认证状态:" + subject.isAuthenticated());
        } catch (UnknownAccountException e) {
            System.out.println("认证失败:用户名不存在");
        } catch (IncorrectCredentialsException ex) {
            System.out.println("认证失败:用户密码错误");
        }
    }
}
步骤:
-
创建安全管理对象
DefaultSecurityManager securityManager = new DefaultSecurityManager(); -
给安全管理对象设置主体
securityManager.setRealm(new IniRealm("classpath:shiro.ini"));这个主体数据是从刚才上面创建的ini文件中读取数据。在实际开发中不是这样写的,一般需要自定义realm,把自定realm设置进来。
-
给安全全局工具类设置安全管理器
SecurityUtils.setSecurityManager(securityManager); -
从安全工具类中获取主体
Subject subject = SecurityUtils.getSubject(); -
创建令牌
UsernamePasswordToken token = new UsernamePasswordToken("xiaoming", "123456"); -
主体执行登录方法
subject.login(token);注意:这里会有两个异常,一个是登录账号错误异常UnknownAccountException,还有一个是凭证错误的异常IncorrectCredentialsException
-
2.不加密认证
自定义realm。
public class CustomerRealm extends AuthorizingRealm {
    // 授权
    @Override
    protected AuthorizationInfo doGetAuthorizationInfo(PrincipalCollection principalCollection) {
        return null;
    }

    // 认证
    @Override
    protected AuthenticationInfo doGetAuthenticationInfo(AuthenticationToken authenticationToken) throws AuthenticationException {
        // 在 token 中获取用户名
        String principal = (String) authenticationToken.getPrincipal();

        System.out.println(principal);

        // 根据身份信息使用 mybatis 查询相关的数据库
        if ("xiaoming".equals(principal)) {
            // 参数1 数据库中的用户名  参数2 数据库中的密码  参数3 提供当前 realm 的名字 this.getName();
            SimpleAuthenticationInfo simpleAuthenticationInfo = new SimpleAuthenticationInfo(principal, "123456", this.getName());
            return simpleAuthenticationInfo;
        }

        return null;
    }
}
注意:继承AuthorizingRealm类,重写该类中的两个方法。
因为AuthorizingRealm类继承了AuthenticatingRealm类,所以既有认证方法,也有授权方法,因此,当我们需要自己定义realm类时,只需要继承AuthorizingRealm类即可。
编写测试类。
public class TestCustomerRealmAuthenticator {

    public static void main(String[] args) {

        // 1. 创建 securityManager
        DefaultSecurityManager defaultSecurityManager = new DefaultSecurityManager();

        // 2. 设置自定义 realm
        defaultSecurityManager.setRealm(new CustomerRealm());

        // 3. 将安全工具类设置安全管理器
        SecurityUtils.setSecurityManager(defaultSecurityManager);

        // 4. 通过安全工具类获取 subject
        Subject subject = SecurityUtils.getSubject();

        // 5. 创建 token
        UsernamePasswordToken token = new UsernamePasswordToken("xiaoming", "123456");

        try {
            // 6. 调用认证方法
            subject.login(token);
            System.out.println(subject.isAuthenticated());
        } catch (UnknownAccountException e) {
            e.printStackTrace();
            System.out.println("用户名错误");
        } catch (IncorrectCredentialsException e) {
            e.printStackTrace();
            System.out.println("密码错误");
        }
    }
}
步骤:
- 创建安全管理器对象。
- 把自定义的realm设置到安全管理器对象中,即通过setter方法注入到安全管理器对象中。
- 通过安全工具类中的setSecurityManager()把创建的安全管理器对象注入到安全管理工具类中。
- 通过安全管理工具类获取主体。
- 创建token。
- 让主体调用login(token)进行认证。
3.加密认证
使用md5+salt+hash进行加密。
自定义realm。
public class CustomerMd5Realm extends AuthorizingRealm {
    // 权限
    @Override
    protected AuthorizationInfo doGetAuthorizationInfo(PrincipalCollection principalCollection) {
        return null;
    }

    // 认证
    @Override
    protected AuthenticationInfo doGetAuthenticationInfo(AuthenticationToken authenticationToken) throws AuthenticationException {
        // 获取身份信息
        String principal = (String) authenticationToken.getPrincipal();

        // 根据用户名查询数据库
        if ("xiaoming".equals(principal)) {
            // 参数1 数据库中的用户名  参数2 数据库 md5 + salt 之后的密码  参数3 注册时的随机盐  参数4 realm 的名字
            return new SimpleAuthenticationInfo(principal,
                    "e4f9bf3e0c58f045e62c23c533fcf633",
                    ByteSource.Util.bytes("X0*7ps"),
                    this.getName());
        }
        return null;
    }
}
测试类。
public class TestCustomerMd5Realm {
    public static void main(String[] args) {
        // 1. 创建安全管理器
        DefaultSecurityManager defaultSecurityManager = new DefaultSecurityManager();
        // 2. 设置 realm 使用 hash 凭证匹配器
        HashedCredentialsMatcher hashedCredentialsMatcher = new HashedCredentialsMatcher();
        // 3. 使用的算法
        hashedCredentialsMatcher.setHashAlgorithmName("md5");
        // 4. 散列的次数
        hashedCredentialsMatcher.setHashIterations(1024);
        // 5. 创建 realm 并注入哈希凭证匹配器
        CustomerMd5Realm realm = new CustomerMd5Realm();
        realm.setCredentialsMatcher(hashedCredentialsMatcher);
        // 6. 安全管理器注入自定义的 realm
        defaultSecurityManager.setRealm(realm);

        // 7. 将安全管理器注入安全工具类
        SecurityUtils.setSecurityManager(defaultSecurityManager);
        // 8. 通过安全工具类获取 subject
        Subject subject = SecurityUtils.getSubject();
        // 9. 创建 token
        UsernamePasswordToken token = new UsernamePasswordToken("xiaoming", "123");

        try {
            // 10. 进行认证
            subject.login(token);
            System.out.println("登录成功");
        } catch (UnknownAccountException e) {
            e.printStackTrace();
            System.out.println("用户名错误");
        } catch (IncorrectCredentialsException e) {
            e.printStackTrace();
            System.out.println("密码错误");
        }
    }
}
这里需要注意:这里使用里md5加密,所以我们要在测试类中设置自定义的realm使用hash凭证匹配器,而不是使用默认的简单凭证匹配器,如果不设置,则会使用简单的凭证匹配器。使用HashedCredentialsMatcher hashedCredentialsMatcher = new HashedCredentialsMatcher();创建一个哈希凭证匹配器。然后设置使用哪种算法加密,这里使用md5。然后设置散列的次数,最后要记得把它注入到主体中。
6.授权

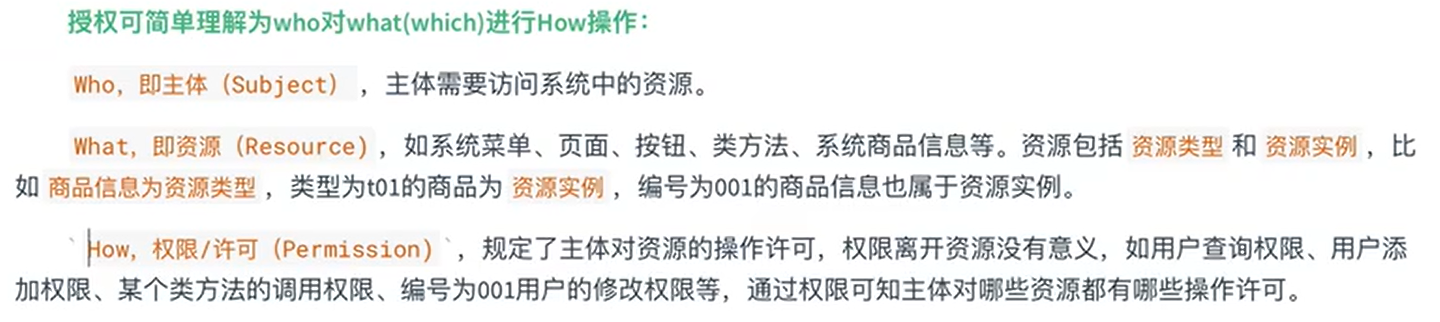
授权流程:
授权方式:

权限字符串:
权限字符串的规则是:资源标识符:操作:资源实例标识符。意思是对那个资源的哪个实例具有什么操作。权限字符串也可以使用*通配符。
例如:
- 用户创建权限:
user:create或user:create:* - 用户001的修改权限:
user:update:001 - 用户001的所有权限:
user:*:001
授权实现方式:
1. 开发授权
自定义一个realm,继承AuthorizingRealm类,并重写doGetAuthorizationInfo和doGetAuthenticationInfo方法。其中doGetAuthorizationInfo是授权方法,把授权的相关逻辑写到该方法内。要授权,必须先认证。
public class CustomerRealm extends AuthorizingRealm {
    @Override
    protected AuthorizationInfo doGetAuthorizationInfo(PrincipalCollection principalCollection) {

        // 1. 获取身份信息
        String primaryPrincipal = (String) principalCollection.getPrimaryPrincipal();
        System.out.println("调用授权验证:" + primaryPrincipal);
        // 2. 根据主身份信息获取角色 和 权限信息
        UserService userService = (UserService) ApplicationContextUtils.getBean("userService");
        User user = userService.findRolesByUserName(primaryPrincipal);
        // 2.1 获取角色
        if (!CollectionUtils.isEmpty(user.getRoles())) {
            SimpleAuthorizationInfo simpleAuthorizationInfo = new SimpleAuthorizationInfo();
            user.getRoles().forEach(role -> {
                simpleAuthorizationInfo.addRole(role.getName());

                // 2.2 获取权限信息
                List<Perms> perms = userService.findPermsByRoleId(role.getId());
                if (!CollectionUtils.isEmpty(perms)) {
                    perms.forEach(perm -> {
                        simpleAuthorizationInfo.addStringPermission(perm.getName());
                    });
                }
            });
            return simpleAuthorizationInfo;
        }
        return null;
    }

    @Override
    protected AuthenticationInfo doGetAuthenticationInfo(AuthenticationToken authenticationToken) throws AuthenticationException {

        System.out.println("=============");

        // 获取身份信息
        String principal = (String) authenticationToken.getPrincipal();

        // 在工厂中获取 service 对象
        UserService userService = (UserService) ApplicationContextUtils.getBean("userService");

        User user = userService.findByUserName(principal);

        if (!ObjectUtils.isEmpty(user)) {
            return new SimpleAuthenticationInfo(user.getUsername(), user.getPassword(), new MyByteSource(user.getSalt()), this.getName());
        }
        return null;
    }
}
7.SpringBoot整合shiro
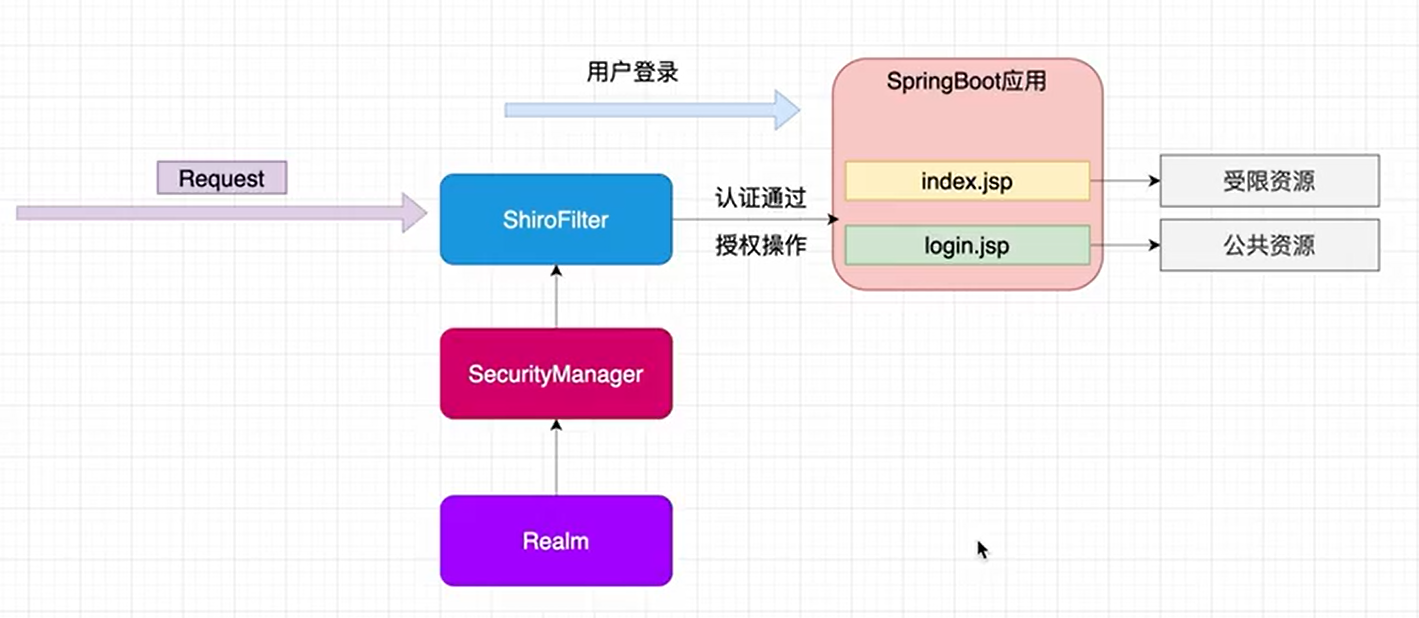
引入相关依赖。
<!-- shiro 整合 SpringBoot 依赖 -->
<dependency>
    <groupId>org.apache.shiro</groupId>
    <artifactId>shiro-spring-boot-starter</artifactId>
    <version>1.9.0</version>
</dependency>
这里以jsp为视图,所以也要引入jsp的相关依赖。
<!-- 引入 jsp 依赖 -->
<dependency>
    <groupId>org.apache.tomcat.embed</groupId>
    <artifactId>tomcat-embed-jasper</artifactId>
</dependency>

<dependency>
    <groupId>jstl</groupId>
    <artifactId>jstl</artifactId>
</dependency>
-
创建webapp目录。
-
创建index.jsp页面
<%@page contentType="text/html; UTF-8" pageEncoding="UTF-8" isELIgnored="false" %>
<!doctype html>
<html lang="zh">
<head>
    <meta charset="UTF-8">
    <meta name="viewport"
          content="width=device-width, user-scalable=no, initial-scale=1.0, maximum-scale=1.0, minimum-scale=1.0">
    <meta http-equiv="X-UA-Compatible" content="ie=edge">
    <title>Document</title>
</head>
<body>
    <h1>系统主页</h1>

    <ul>
        <li><a href="">用户管理</a></li>
        <li><a href="">商品管理</a></li>
        <li><a href="">订单管理</a></li>
        <li><a href="">物流管理</a></li>
    </ul>
</body>
</html>
加上
<%@page contentType="text/html; UTF-8" pageEncoding="UTF-8" isELIgnored="false" %>防止中文乱码。 -
同理创建login.jsp页面。
<%@page contentType="text/html; UTF-8" pageEncoding="UTF-8" isELIgnored="false" %> <!doctype html> <html lang="zh"> <head> <meta charset="UTF-8"> <meta name="viewport" content="width=device-width, user-scalable=no, initial-scale=1.0, maximum-scale=1.0, minimum-scale=1.0"> <meta http-equiv="X-UA-Compatible" content="ie=edge"> <title>Document</title> </head> <body> <h1>用户登录</h1> </body> </html> -
创建config目录,创建shiro的配置类。
/** * 用来整合 shiro 相关的配置类 * */ @Configuration public class ShiroConfig { // 1. 创建 shiroFilter 负责拦截所有请求 @Bean("filterShiroFilterRegistrationBean") public ShiroFilterFactoryBean getShiroFilterFactoryBean(DefaultWebSecurityManager defaultWebSecurityManager) { ShiroFilterFactoryBean shiroFilterFactoryBean = new ShiroFilterFactoryBean(); // 给 filter 设置安全管理器 shiroFilterFactoryBean.setSecurityManager(defaultWebSecurityManager); // 配置系统受限资源 // 配置系统公共资源 Map<String, String> map = new HashMap<>(); map.put("/index.jsp", "authc"); // authc 请求这个资源需要认证和授权 // 默认认证界面路径 shiroFilterFactoryBean.setLoginUrl("/login.jsp"); shiroFilterFactoryBean.setFilterChainDefinitionMap(map); return shiroFilterFactoryBean; } // 2. 创建安全管理器 @Bean public DefaultWebSecurityManager getDefaultWebSecurityManager(@Qualifier("getRealm") Realm realm) { DefaultWebSecurityManager defaultWebSecurityManager = new DefaultWebSecurityManager(); // 给安全管理器设置 realm defaultWebSecurityManager.setRealm(realm); return defaultWebSecurityManager; } // 3. 创建自定义的 realm @Bean public Realm getRealm() { CustomerRealm customerRealm = new CustomerRealm(); return customerRealm; } } -
创建shiro目录,并在shiro目录下创建子目录realm创建自定义realm类。
public class CustomerRealm extends AuthorizingRealm {
    @Override
    protected AuthorizationInfo doGetAuthorizationInfo(PrincipalCollection principalCollection) {
        return null;
    }

    @Override
    protected AuthenticationInfo doGetAuthenticationInfo(AuthenticationToken authenticationToken) throws AuthenticationException {
        return null;
    }
}
由于使用jsp作为视图,SpingBoot中需要修改配置文件,如下。
server.port=8888
server.servlet.context-path=/shiro
spring.application.name=shiro

spring.mvc.view.prefix=/
spring.mvc.view.suffix=.jsp
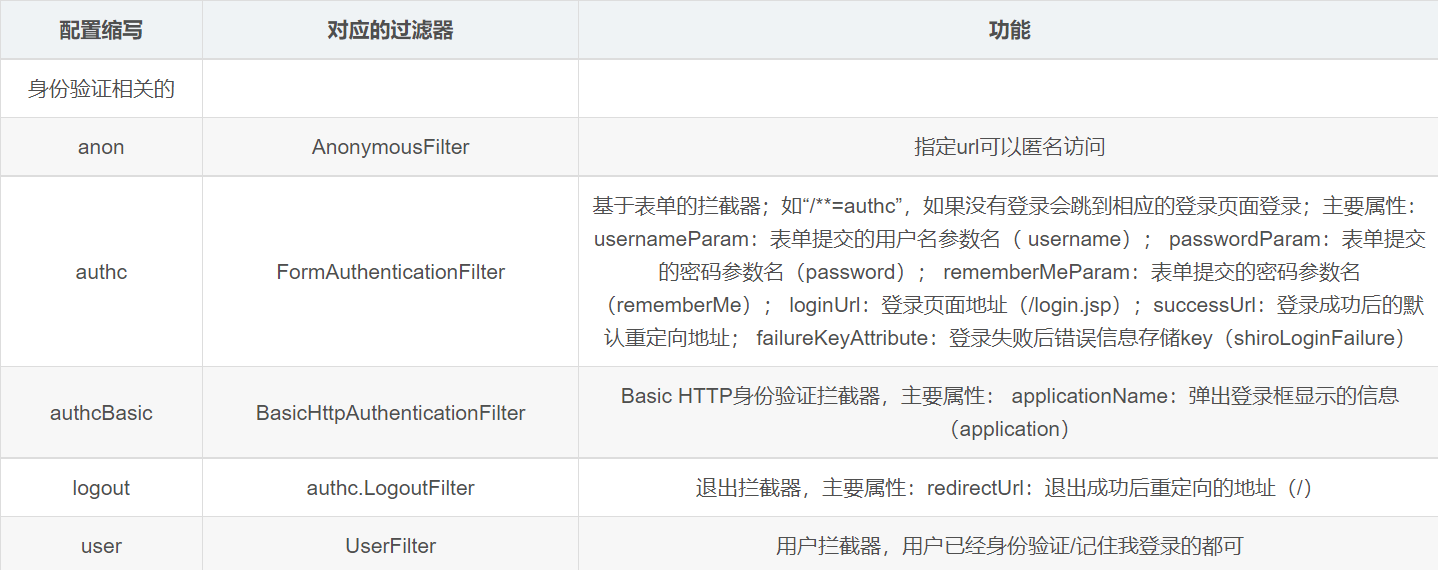
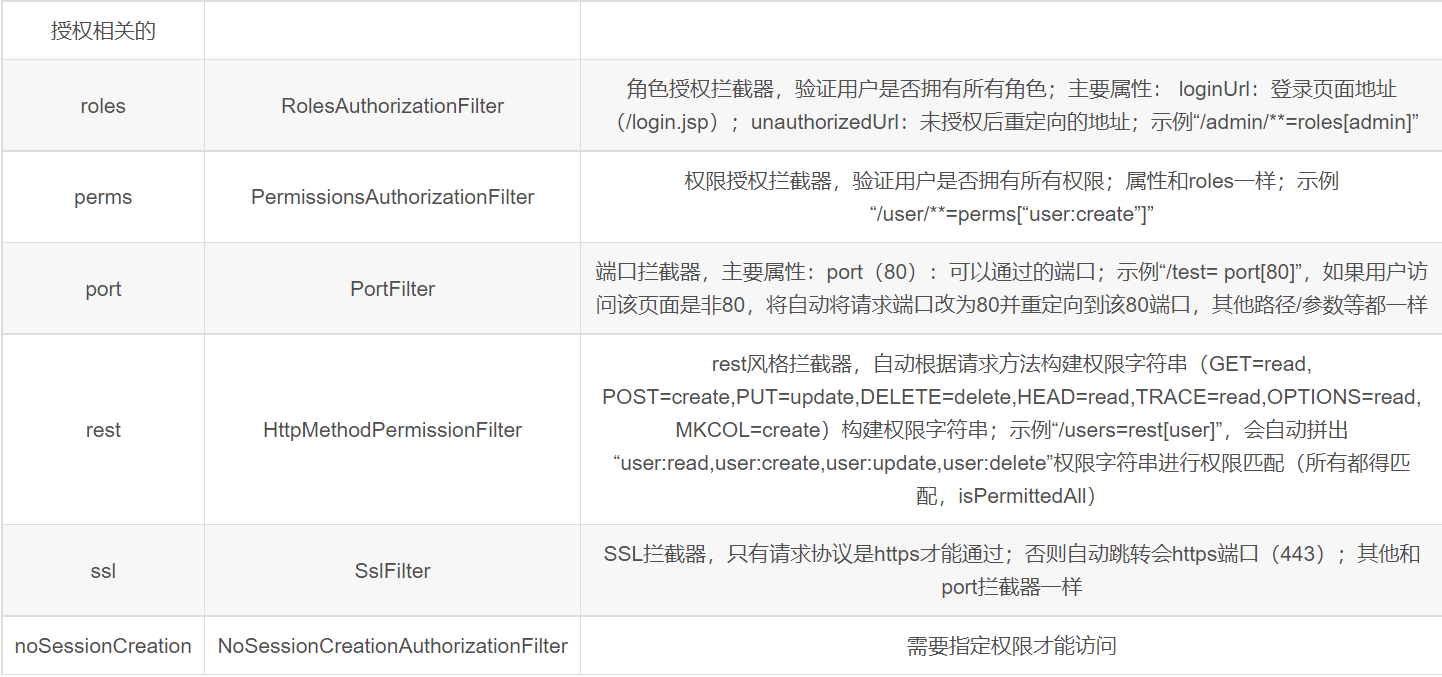
1.shiro中默认的过滤器
2. 开发
编写数据库。
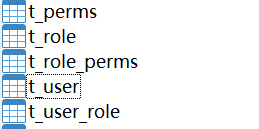
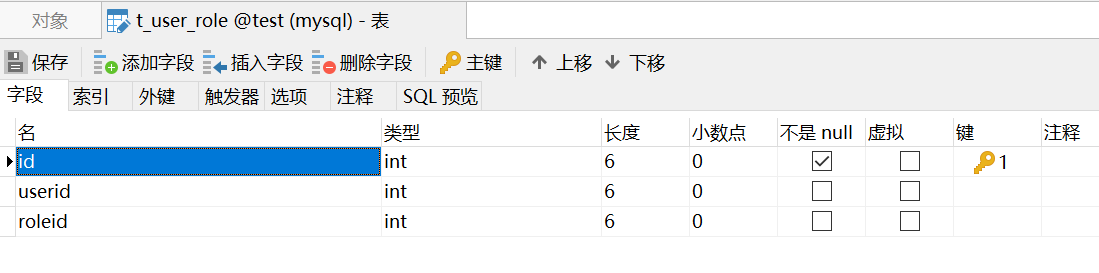
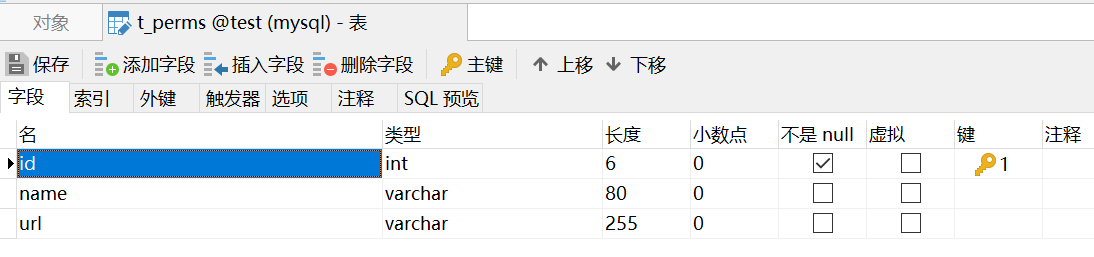
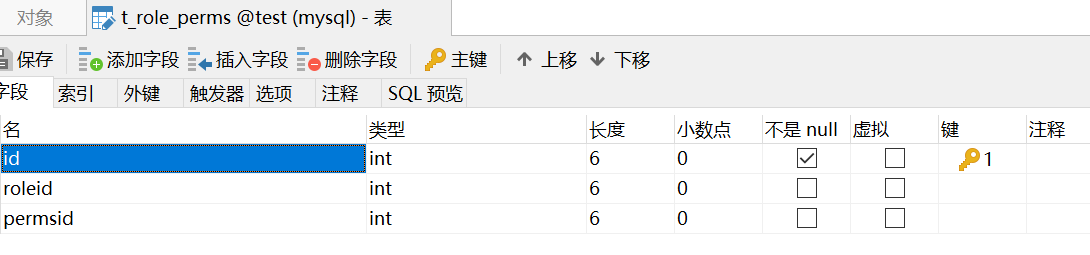
t_user是存放用户信息,t_role存放角色,t_user_role存放用户和角色之间的关系,t_perms存放授权字符串,t_role_perms存放角色和授权之间的关系。
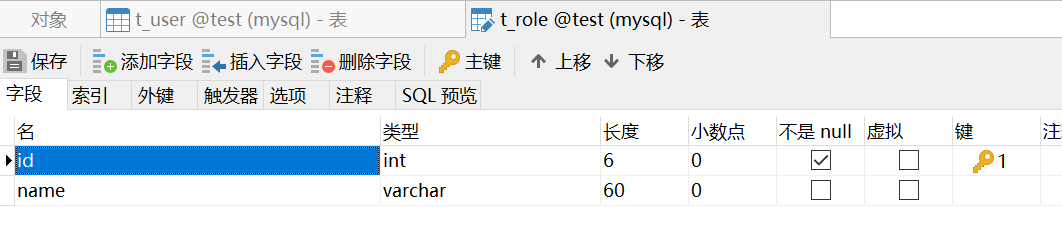
表结构:
t_user表:

t_role表:
t_user_role表:
t_perms表:
t_role_perms表:
引入相关依赖。
<?xml version="1.0" encoding="UTF-8"?>
<project xmlns="http://maven.apache.org/POM/4.0.0" xmlns:xsi="http://www.w3.org/2001/XMLSchema-instance"
         xsi:schemaLocation="http://maven.apache.org/POM/4.0.0 https://maven.apache.org/xsd/maven-4.0.0.xsd">
    <modelVersion>4.0.0</modelVersion>
    <parent>
        <groupId>org.springframework.boot</groupId>
        <artifactId>spring-boot-starter-parent</artifactId>
        <version>2.6.6</version>
        <relativePath/> <!-- lookup parent from repository -->
    </parent>
    <groupId>top.lukeewin</groupId>
    <artifactId>demo-shiro-boot</artifactId>
    <version>0.0.1-SNAPSHOT</version>
    <name>demo-shiro-boot</name>
    <description>Demo project for Spring Boot</description>
    <properties>
        <java.version>1.8</java.version>
    </properties>
    <dependencies>
        <dependency>
            <groupId>org.springframework.boot</groupId>
            <artifactId>spring-boot-starter-web</artifactId>
        </dependency>

        <dependency>
            <groupId>org.springframework.boot</groupId>
            <artifactId>spring-boot-devtools</artifactId>
            <scope>runtime</scope>
            <optional>true</optional>
        </dependency>
        <dependency>
            <groupId>org.springframework.boot</groupId>
            <artifactId>spring-boot-configuration-processor</artifactId>
            <optional>true</optional>
        </dependency>
        <dependency>
            <groupId>org.projectlombok</groupId>
            <artifactId>lombok</artifactId>
            <optional>true</optional>
        </dependency>
        <dependency>
            <groupId>org.springframework.boot</groupId>
            <artifactId>spring-boot-starter-test</artifactId>
            <scope>test</scope>
        </dependency>

        <!-- 引入 jsp 依赖 -->
        <dependency>
            <groupId>org.apache.tomcat.embed</groupId>
            <artifactId>tomcat-embed-jasper</artifactId>
        </dependency>

        <dependency>
            <groupId>jstl</groupId>
            <artifactId>jstl</artifactId>
            <version>1.2</version>
        </dependency>

        <!-- shiro 整合 SpringBoot 依赖 -->
        <dependency>
            <groupId>org.apache.shiro</groupId>
            <artifactId>shiro-spring-boot-starter</artifactId>
            <version>1.9.0</version>
        </dependency>

        <!-- 引入 ehcache 依赖 -->
        <dependency>
            <groupId>org.apache.shiro</groupId>
            <artifactId>shiro-ehcache</artifactId>
            <version>1.9.0</version>
        </dependency>

        <!-- 引入 mysql 连接驱动依赖 -->
        <dependency>
            <groupId>mysql</groupId>
            <artifactId>mysql-connector-java</artifactId>
        </dependency>

        <!-- 引入 mybatis 启动器依赖 -->
        <dependency>
            <groupId>org.mybatis.spring.boot</groupId>
            <artifactId>mybatis-spring-boot-starter</artifactId>
            <version>2.2.2</version>
        </dependency>

        <!-- druid -->
        <dependency>
            <groupId>com.alibaba</groupId>
            <artifactId>druid-spring-boot-starter</artifactId>
            <version>1.2.9</version>
        </dependency>

        <!-- redis -->
        <dependency>
            <groupId>org.springframework.boot</groupId>
            <artifactId>spring-boot-starter-data-redis</artifactId>
        </dependency>

    </dependencies>

    <build>
        <plugins>
            <plugin>
                <groupId>org.springframework.boot</groupId>
                <artifactId>spring-boot-maven-plugin</artifactId>
                <configuration>
                    <excludes>
                        <exclude>
                            <groupId>org.projectlombok</groupId>
                            <artifactId>lombok</artifactId>
                        </exclude>
                    </excludes>
                </configuration>
            </plugin>
        </plugins>
    </build>

</project>
编写对应的实体类:
User:
@Data
@Accessors(chain = true)
@AllArgsConstructor
@NoArgsConstructor
public class User implements Serializable {
    private Integer id;
    private String username;
    private String password;
    private String salt;

    // 定义角色集合
    private List<Role> roles;

}
Role:
@Data
@Accessors(chain = true)
@AllArgsConstructor
@NoArgsConstructor
public class Role implements Serializable {
    private String id;
    private String name;

    // 定义权限集合
    private List<Perms> perms;
}
Perms:
@Data
@Accessors(chain = true)
@AllArgsConstructor
@NoArgsConstructor
public class Perms implements Serializable {
    private String id;
    private String name;
}
编写Dao:
public interface UserDao {
    void save(User user);

    User findByUserName(String username);

    // 根据用户名查询所有角色
    User findRolesByUserName(String username);

    // 根据角色 id 查询权限集合
    List<Perms> findPermsByRoleId(String id);

}
编写mapper.xml文件:
<?xml version="1.0" encoding="UTF-8"?>
<!DOCTYPE mapper PUBLIC "-//mybatis.org//DTD Mapper 3.0//EN" "http://mybatis.org/dtd/mybatis-3-mapper.dtd">
<mapper namespace="top.lukeewin.dao.UserDao">

    <resultMap id="userMap" type="User">
        <id column="uid" property="id"/>
        <result column="username" property="username"/>
        <!-- 角色信息 -->
        <collection property="roles" javaType="list" ofType="Role">
            <id column="id" property="id"/>
            <result column="rname" property="name"/>
        </collection>
    </resultMap>

    <insert id="save" parameterType="User" useGeneratedKeys="true" keyProperty="id">
        insert into t_user values (#{id}, #{username}, #{password}, #{salt})
    </insert>
    <select id="findByUserName" resultType="User" parameterType="String">
        select id, username, password, salt from t_user where username = #{username}
    </select>

    <select id="findRolesByUserName" resultMap="userMap" parameterType="String">
        select u.id uid,u.username,r.id,r.`name` rname
        from t_user u
        LEFT JOIN t_user_role ur
        ON u.id=ur.userid
        LEFT JOIN t_role r
        ON ur.roleid=r.id
        WHERE u.username=#{username}
    </select>

    <select id="findPermsByRoleId" resultType="Perms" parameterType="String">
        SELECT p.id,p.`name`,p.url,r.`name`
        FROM t_role r
        LEFT JOIN t_role_perms rp
        ON r.id=rp.roleid
        LEFT JOIN t_perms p
        ON rp.permsid=p.id
        WHERE r.id=#{id}
    </select>
</mapper>
编写业务层:
public interface UserService {
    // 注册
    void register(User user);

    // 根据用户名查询业务的方法
    User findByUserName(String username);

    User findRolesByUserName(String username);

    // 根据角色 id 查询权限集合
    List<Perms> findPermsByRoleId(String id);
}
业务层的实现类:
@Service("userService")
@Transactional
public class UserServiceImpl implements UserService {

    @Autowired
    private UserDao userDao;

    @Override
    public void register(User user) {
        // 处理业务调用dao
        // 1. 生成随机 salt
        String salt = SaltUtils.getSalt(8);
        // 2. 将随机盐保存到数据库
        user.setSalt(salt);
        // 3. 明文密码进行 md5 + salt + hash
        Md5Hash md5Hash = new Md5Hash(user.getPassword(), salt ,1024);
        user.setPassword(md5Hash.toHex());
        userDao.save(user);
    }

    @Override
    public User findByUserName(String username) {
        return userDao.findByUserName(username);
    }

    @Override
    public User findRolesByUserName(String username) {
        return userDao.findRolesByUserName(username);
    }

    @Override
    public List<Perms> findPermsByRoleId(String id) {
        return userDao.findPermsByRoleId(id);
    }
}
编写控制类:
@Controller
@RequestMapping("/user")
public class UserController {

    @Autowired
    private UserService userService;

    // 注册
    @RequestMapping("/register")
    public String register(User user) {
        try {
            userService.register(user);
            return "redirect:/login.jsp";
        } catch (Exception e) {
            e.printStackTrace();
            return "redirect:/register.jsp";
        }
    }

    // 退出登录
    @RequestMapping("/logout")
    public String logout() {
        Subject subject = SecurityUtils.getSubject();
        subject.logout();
        return "redirect:/login.jsp";
    }

    @RequestMapping("/login")
    public String login(String username, String password) {

        // 获取主体对象
        Subject subject = SecurityUtils.getSubject();

        // 认证
        try {
            subject.login(new UsernamePasswordToken(username, password));
            return "redirect:/index.jsp";
        } catch (UnknownAccountException e) {
            e.printStackTrace();
            System.out.println("用户名错误!");
        } catch (IncorrectCredentialsException e) {
            e.printStackTrace();
            System.out.println("密码错误!");
        }
        return "redirect:/login.jsp";
    }

}
@Controller
@RequestMapping("/order")
public class OrderController {
@RequestMapping("/save")
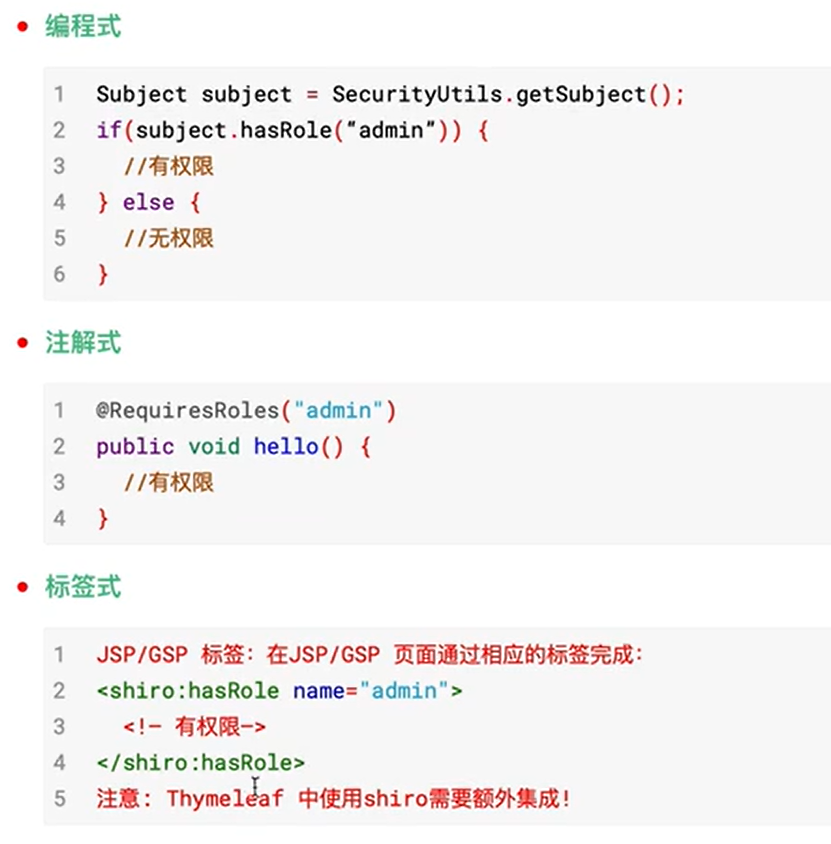
// @RequiresRoles(value = {"admin", "user"}, logical = Logical.OR) // 用来判断角色 不加 logical = Logical.OR 则默认为 AND
@RequiresPermissions("user:update:02") // 用来判读权限字符串
public String save() {
System.out.println("进入方法");
// 获取主体对象
/*Subject subject = SecurityUtils.getSubject();
// 代码方式
if (subject.hasRole("admin")) {
System.out.println("保存订单!");
} else {
System.out.println("无权访问!");
}*/
// 基于权限字符串
return "redirect:/index.jsp";
}
}
编写获取IOC中的bean的工具类:
@Component
public class ApplicationContextUtils implements ApplicationContextAware {

    private static ApplicationContext context;

    @Override
    public void setApplicationContext(ApplicationContext applicationContext) throws BeansException {
        context = applicationContext;
    }

    // 根据 bean 名字获取工厂中指定的 bean 对象
    public static Object getBean(String beanName) {
        return context.getBean(beanName);
    }
}
编写生成随机盐的工具类:
public class SaltUtils {

    /**
     * 生成 salt 的静态方法
     * */
    public static String getSalt(int n) {
        char[] chars = "ABCDEFGHIJKLMNOPQRSTUVWXYZabcdefghijklmnopqrstuvwxyz1234567890!@#$%^&*()".toCharArray();
        StringBuilder stringBuilder = new StringBuilder();
        for (int i = 0; i < n; i++) {
            char aChar = chars[new Random().nextInt(chars.length)];
            stringBuilder.append(aChar);
        }
        return stringBuilder.toString();
    }

    public static void main(String[] args) {
        String salt = getSalt(8);
        System.out.println(salt);
    }
}
编写自定义realm:
自定义realm类必须要继承AuthorizingRealm类。
public class CustomerRealm extends AuthorizingRealm {
    @Override
    protected AuthorizationInfo doGetAuthorizationInfo(PrincipalCollection principalCollection) {

        // 获取身份信息
        String primaryPrincipal = (String) principalCollection.getPrimaryPrincipal();
        System.out.println("调用授权验证:" + primaryPrincipal);
        // 根据主身份信息获取角色 和 权限信息
        UserService userService = (UserService) ApplicationContextUtils.getBean("userService");
        User user = userService.findRolesByUserName(primaryPrincipal);
        //
        if (!CollectionUtils.isEmpty(user.getRoles())) {
            SimpleAuthorizationInfo simpleAuthorizationInfo = new SimpleAuthorizationInfo();
            user.getRoles().forEach(role -> {
                simpleAuthorizationInfo.addRole(role.getName());

                // 权限信息
                List<Perms> perms = userService.findPermsByRoleId(role.getId());
                if (!CollectionUtils.isEmpty(perms)) {
                    perms.forEach(perm -> {
                        simpleAuthorizationInfo.addStringPermission(perm.getName());
                    });
                }
            });
            return simpleAuthorizationInfo;
        }
        return null;
    }

    @Override
    protected AuthenticationInfo doGetAuthenticationInfo(AuthenticationToken authenticationToken) throws AuthenticationException {

        System.out.println("=============");

        // 获取身份信息
        String principal = (String) authenticationToken.getPrincipal();

        // 在工厂中获取 service 对象
        UserService userService = (UserService) ApplicationContextUtils.getBean("userService");

        User user = userService.findByUserName(principal);

        if (!ObjectUtils.isEmpty(user)) {
            return new SimpleAuthenticationInfo(user.getUsername(), user.getPassword(), new MyByteSource(user.getSalt()), this.getName());
        }
        return null;
    }
}
编写ShiroConfig类:
该类用于配置shiro,注意:web项目使用的安全管理器不是DefaultSecurityManager对象,而是DefaultWebSecurityManager对象。
步骤:
- 创建一个
filterShiroFilterRegistrationBean的bean对象。 new一个ShiroFilterFactoryBean对象。- 给
ShiroFilterFactoryBean对象注入默认的web安全管理器对象。 - 配置项目的公共资源和受限资源,公共资源在前,受限资源在后。
- 编写默认的认证访问url,有默认的访问url,默认为
/login.jsp。 - 把这些资源注入到
shiroFilterFactoryBean对象中。 - 最后返回
shiroFilterFactoryBean对象。
此外我们还需要创建getDefaultWebSecurityManager。
- 通过方法的参数把realm注入到
DefaultWebSecurityManager对象中。如果报错,需要加上@Qualifier("getRealm")。 - 给安全管理器设置自定义 realm。
此外我们还需要获取自定义的 realm。
- 给自定义的 realm 设置使用的凭证匹配器,加密算法,散列次数。
- 修改默认的凭证匹配器:
HashedCredentialsMatcher credentialsMatcher = new HashedCredentialsMatcher();。 - 规定使用的加密算法:
credentialsMatcher.setHashAlgorithmName("MD5");。 - 规定散列次数:
credentialsMatcher.setHashIterations(1024);。 - 把凭证匹配器注入到自定义的realm中。
- 开启缓存,这里使用redis作为缓存,需要先配置redis。
- 开启全局缓存,之可以开启认证缓存和授权缓存,并且可以设定缓存的名字。
@Configuration
public class ShiroConfig {

    // 1. 创建 shiroFilter  负责拦截所有请求
    @Bean("filterShiroFilterRegistrationBean")
    public ShiroFilterFactoryBean getShiroFilterFactoryBean(DefaultWebSecurityManager defaultWebSecurityManager) {
        ShiroFilterFactoryBean shiroFilterFactoryBean = new ShiroFilterFactoryBean();

        // 给 filter 设置安全管理器
        shiroFilterFactoryBean.setSecurityManager(defaultWebSecurityManager);

        // 配置系统受限资源
        // 配置系统公共资源
        Map<String, String> map = new HashMap<>();
        map.put("/user/login", "anon");
        map.put("/user/register", "anon");
        map.put("/register.jsp", "anon");
        map.put("/**", "authc"); // authc 请求这个资源需要认证和授权

        // 默认认证界面路径
        shiroFilterFactoryBean.setLoginUrl("/login.jsp");

        shiroFilterFactoryBean.setFilterChainDefinitionMap(map);

        return shiroFilterFactoryBean;
    }

    // 2. 创建安全管理器
    @Bean
    public DefaultWebSecurityManager getDefaultWebSecurityManager(@Qualifier("getRealm") Realm realm) {
        DefaultWebSecurityManager defaultWebSecurityManager = new DefaultWebSecurityManager();

        // 给安全管理器设置 realm
        defaultWebSecurityManager.setRealm(realm);

        return defaultWebSecurityManager;
    }

    // 3. 创建自定义的 realm
    @Bean
    public Realm getRealm() {
        CustomerRealm customerRealm = new CustomerRealm();

        // 修改凭证校验器
        HashedCredentialsMatcher credentialsMatcher = new HashedCredentialsMatcher();
        // 设置加密算法
        credentialsMatcher.setHashAlgorithmName("MD5");
        // 设置散列次数
        credentialsMatcher.setHashIterations(1024);
        // 注入到自定义的 realm 中
        customerRealm.setCredentialsMatcher(credentialsMatcher);

        // 开启缓存管理
        customerRealm.setCacheManager(new RedisCacheManager());
        customerRealm.setCachingEnabled(true); // 开启全局缓存
        customerRealm.setAuthenticationCachingEnabled(true); // 开启认证缓存
        customerRealm.setAuthenticationCacheName("authenticationCache");
        customerRealm.setAuthorizationCachingEnabled(true); // 开启授权缓存
        customerRealm.setAuthorizationCacheName("authorizationCache");

        return customerRealm;
    }

}
编写RedisCacheManager类:
// 自定义 shiro 缓存管理器
public class RedisCacheManager implements CacheManager {
    // 参数:认证或者授权缓存的统一名称
    @Override
    public <K, V> Cache<K, V> getCache(String cacheName) throws CacheException {
        System.out.println(cacheName);
        return new RedisCache<K,V>(cacheName);
    }
}
编写RedisCache类:
该类要实现shiro中的Cache<K, V>接口。
// 自定义 redis 缓存的实现
public class RedisCache<K, V> implements Cache<K, V> {

    private String cacheName;

    public RedisCache() {
    }

    public RedisCache(String cacheName) {
        this.cacheName = cacheName;
    }

    @Override
    public V get(K k) throws CacheException {
        System.out.println("get key:" + k);
        return (V) getRedisTemplate().opsForHash().get(this.cacheName,k.toString());
    }

    @Override
    public V put(K k, V v) throws CacheException {
        System.out.println("put key:" + k);
        System.out.println("put value:" + v);
        getRedisTemplate().opsForHash().put(this.cacheName,k.toString(),v);
        return null;
    }

    @Override
    public V remove(K k) throws CacheException {
        System.out.println("=========remove============");
        return (V) getRedisTemplate().opsForHash().delete(this.cacheName, k.toString());
    }

    @Override
    public void clear() throws CacheException {
        System.out.println("=========clear============");
        getRedisTemplate().delete(this.cacheName);
    }

    @Override
    public int size() {
        return getRedisTemplate().opsForHash().size(this.cacheName).intValue();
    }

    @Override
    public Set<K> keys() {
        return getRedisTemplate().opsForHash().keys(this.cacheName);
    }

    @Override
    public Collection<V> values() {
        return getRedisTemplate().opsForHash().values(this.cacheName);
    }

    private RedisTemplate getRedisTemplate(){
        RedisTemplate redisTemplate = (RedisTemplate) ApplicationContextUtils.getBean("redisTemplate");
        redisTemplate.setKeySerializer(new StringRedisSerializer());
        redisTemplate.setHashKeySerializer(new StringRedisSerializer());
        return redisTemplate;
    }
}
application.properties文件:
server.port=8888
server.servlet.context-path=/shiro
spring.application.name=shiro

spring.mvc.view.prefix=/
spring.mvc.view.suffix=.jsp

spring.datasource.type=com.alibaba.druid.pool.DruidDataSource
spring.datasource.driver-class-name=com.mysql.cj.jdbc.Driver
spring.datasource.url=jdbc:mysql://localhost:3306/test?characterEncoding=UTF-8&serverTimezone=Asia/Shanghai
spring.datasource.username=root
spring.datasource.password=root

spring.redis.port=6379
spring.redis.host=localhost
spring.redis.database=0

mybatis.type-aliases-package=top.lukeewin.entity
mybatis.mapper-locations=classpath:top/lukeewin/mapper/*.xml

logging.level.top.lukeewin.dao=debug
编写前端页面:
login.jsp页面:
要添加<%@page contentType="text/html; UTF-8" pageEncoding="UTF-8" isELIgnored="false" %>防止中文乱码。
<%@page contentType="text/html; UTF-8" pageEncoding="UTF-8" isELIgnored="false" %>
<!doctype html>
<html lang="zh">
<head>
    <meta charset="UTF-8">
    <meta name="viewport"
          content="width=device-width, user-scalable=no, initial-scale=1.0, maximum-scale=1.0, minimum-scale=1.0">
    <meta http-equiv="X-UA-Compatible" content="ie=edge">
    <title>登录</title>
</head>
<body>
    <h1>用户登录</h1>

    <form action="${pageContext.request.contextPath}/user/login" method="post">
        用户名:<input type="text" name="username"> <br>
        密码:<input type="password" name="password"> <br>
        <input type="submit" value="登录">
    </form>
</body>
</html>
index.jsp页面:
<%@page contentType="text/html; UTF-8" pageEncoding="UTF-8" isELIgnored="false" %>
<%@taglib prefix="shiro" uri="http://shiro.apache.org/tags" %>
<!doctype html>
<html lang="zh">
<head>
    <meta charset="UTF-8">
    <meta name="viewport"
          content="width=device-width, user-scalable=no, initial-scale=1.0, maximum-scale=1.0, minimum-scale=1.0">
    <meta http-equiv="X-UA-Compatible" content="ie=edge">
    <title>主页</title>
</head>
<body>
    <h1>系统主页</h1>
    <a href="${pageContext.request.contextPath}/user/logout">退出登录</a>

    <ul>
        <shiro:hasAnyRoles name="user,admin">
            <li>
                <a href="">用户管理</a>
                <ul>
                    <shiro:hasPermission name="user:add:*">
                        <li><a href="">添加</a></li>
                    </shiro:hasPermission>
                    <shiro:hasPermission name="user:delete:*">
                        <li><a href="">删除</a></li>
                    </shiro:hasPermission>
                    <shiro:hasPermission name="user:update:*">
                        <li><a href="">修改</a></li>
                    </shiro:hasPermission>
                    <shiro:hasPermission name="order:find:*">
                        <li><a href="">查询</a></li>
                    </shiro:hasPermission>
                </ul>
            </li>
        </shiro:hasAnyRoles>
        <shiro:hasRole name="admin">
            <li><a href="">商品管理</a></li>
            <li><a href="">订单管理</a></li>
            <li><a href="">物流管理</a></li>
        </shiro:hasRole>
    </ul>
</body>
</html>
register.jsp页面:
<%@page contentType="text/html; UTF-8" pageEncoding="UTF-8" isELIgnored="false" %>
<!doctype html>
<html lang="zh">
<head>
    <meta charset="UTF-8">
    <meta name="viewport"
          content="width=device-width, user-scalable=no, initial-scale=1.0, maximum-scale=1.0, minimum-scale=1.0">
    <meta http-equiv="X-UA-Compatible" content="ie=edge">
    <title>注册</title>
</head>
<body>
    <h1>用户注册</h1>

    <form action="${pageContext.request.contextPath}/user/register" method="post">
        用户名:<input type="text" name="username"> <br>
        密码:<input type="password" name="password"> <br>
        <input type="submit" value="立即注册">
    </form>
</body>
</html>
3. thymeleaf整合shiro
内容和上面的内容基本相同,这里只记录不相同的部分。
引入相关依赖。
<!-- thymeleaf -->
<dependency>
    <groupId>org.springframework.boot</groupId>
    <artifactId>spring-boot-starter-thymeleaf</artifactId>
</dependency>

<!-- thymeleaf-extras-shiro -->
<dependency>
    <groupId>com.github.theborakompanioni</groupId>
    <artifactId>thymeleaf-extras-shiro</artifactId>
    <version>2.1.0</version>
</dependency>
首先是shiro配置类中的放行路径不同,thymeleaf中,必须要经过控制类的控制才能访问,不能直接访问html文件,这个和jsp有区别。
把shiro配置类中的放行路径修改为如下:
        // 配置系统受限资源
        // 配置系统公共资源
        Map<String, String> map = new HashMap<>();
        map.put("/user/login", "anon");
        map.put("/login.html", "anon");
        map.put("/user/register", "anon");
        map.put("/user/registerview", "anon");

        map.put("/**", "authc"); // authc 请求这个资源需要认证和授权

        // 默认认证界面路径
控制类:
package top.lukeewin.controller;

import org.apache.shiro.SecurityUtils;
import org.apache.shiro.authc.IncorrectCredentialsException;
import org.apache.shiro.authc.UnknownAccountException;
import org.apache.shiro.authc.UsernamePasswordToken;
import org.apache.shiro.subject.Subject;
import org.springframework.beans.factory.annotation.Autowired;
import org.springframework.stereotype.Controller;
import org.springframework.web.bind.annotation.RequestMapping;
import top.lukeewin.entity.User;
import top.lukeewin.service.UserService;

@Controller
@RequestMapping("/user")
public class UserController {

    @Autowired
    private UserService userService;

    /**
     * 跳转到 login 请求
     */
    @RequestMapping("/loginview")
    public String login() {
        System.out.println("跳转到login.html");
        return "login";
    }

    @RequestMapping("/registerview")
    public String register() {
        System.out.println("跳转到register.html");
        return "register";
    }

    // 注册
    @RequestMapping("/register")
    public String register(User user) {
        try {
            userService.register(user);
            return "redirect:/user/loginview";
        } catch (Exception e) {
            e.printStackTrace();
            return "redirect:/user/registerview";
        }
    }

    // 退出登录
    @RequestMapping("/logout")
    public String logout() {
        Subject subject = SecurityUtils.getSubject();
        subject.logout();
        return "redirect:/user/loginview";
    }

    // 登录
    @RequestMapping("/login")
    public String login(String username, String password) {

        // 获取主体对象
        Subject subject = SecurityUtils.getSubject();

        // 认证
        try {
            subject.login(new UsernamePasswordToken(username, password));
            return "redirect:/index";
        } catch (UnknownAccountException e) {
            e.printStackTrace();
            System.out.println("用户名错误!");
        } catch (IncorrectCredentialsException e) {
            e.printStackTrace();
            System.out.println("密码错误!");
        }
        return "redirect:/user/loginview";


    }

}
package top.lukeewin.controller;

import org.springframework.stereotype.Controller;
import org.springframework.web.bind.annotation.RequestMapping;

@Controller
public class IndexController {

    @RequestMapping("/index")
    public String index() {
        System.out.println("index");
        return "index";
    }
}
要在html中使用shiro标签必须要在shiro配置类中添加shiroDialect
// html 中使用 shiro 标签,则要创建下面的 bean
    @Bean(name = "shiroDialect")
    public ShiroDialect shiroDialect(){
        return new ShiroDialect();
    }
并且要在thymeleaf页面中引入shiro的命名空间
<!DOCTYPE html>
<html lang="zh" xmlns:th="http://www.thymeleaf.org"
      xmlns:shiro="http://www.pollix.at/thymeleaf/shiro">
<head>
    <meta charset="UTF-8">
    <title>首页</title>
</head>
<body>
    <h1>欢迎访问主页</h1>
    <span shiro:principal=""></span>

    <!-- 认证处理 -->
    <span shiro:authenticated="">
        认证通过展示内容
    </span>

    <span shiro:notAuthenticated="">
        没有认证通过的内容
    </span>

    <!-- 授权角色 -->
    <span shiro:hasRole="admin">
        This is admin
    </span>

    <!-- 资源授权 -->
    <span shiro:hasPermission="user:*:01">
        具有用户模块的权限
    </span>

</body>
</html>
Q.E.D.