1. 配置国内apt源
备份默认配置
mv /etc/apt/sources.list /etc/apt/sources.list.bak
创建新的配置文件
vim /etc/apt/sources.list
添加国内apt源
deb http://mirrors.aliyun.com/ubuntu/ jammy main restricted universe multiverse
deb-src http://mirrors.aliyun.com/ubuntu/ jammy main restricted universe multiverse
deb http://mirrors.aliyun.com/ubuntu/ jammy-security main restricted universe multiverse
deb-src http://mirrors.aliyun.com/ubuntu/ jammy-security main restricted universe multiverse
deb http://mirrors.aliyun.com/ubuntu/ jammy-updates main restricted universe multiverse
deb-src http://mirrors.aliyun.com/ubuntu/ jammy-updates main restricted universe multiverse
deb http://mirrors.aliyun.com/ubuntu/ jammy-proposed main restricted universe multiverse
deb-src http://mirrors.aliyun.com/ubuntu/ jammy-proposed main restricted universe multiverse
deb http://mirrors.aliyun.com/ubuntu/ jammy-backports main restricted universe multiverse
deb-src http://mirrors.aliyun.com/ubuntu/ jammy-backports main restricted universe multiverse
更新apt源
apt-get update
注意:如果你是在新安装好的系统中,发现执行apt-get update命令提示下面报错内容:
Temporary failure resolving 'mirrors.aliyun.com'
Err:2 http://mirrors.aliyun.com/ubuntu jammy-security InRelease
Temporary failure resolving 'mirrors.aliyun.com'
Err:3 http://mirrors.aliyun.com/ubuntu jammy-updates InRelease
Temporary failure resolving 'mirrors.aliyun.com'
Err:4 http://mirrors.aliyun.com/ubuntu jammy-proposed InRelease
Temporary failure resolving 'mirrors.aliyun.com'
Err:5 http://mirrors.aliyun.com/ubuntu jammy-backports InRelease
Temporary failure resolving 'mirrors.aliyun.com'
Reading package lists... Done
Building dependency tree... Done
Reading state information... Done
All packages are up to date.
W: Failed to fetch http://mirrors.aliyun.com/ubuntu/dists/jammy/InRelease Temporary failure resolving 'mirrors.aliyun.com'
W: Failed to fetch http://mirrors.aliyun.com/ubuntu/dists/jammy-security/InRelease Temporary failure resolving 'mirrors.aliyun.com'
W: Failed to fetch http://mirrors.aliyun.com/ubuntu/dists/jammy-updates/InRelease Temporary failure resolving 'mirrors.aliyun.com'
W: Failed to fetch http://mirrors.aliyun.com/ubuntu/dists/jammy-proposed/InRelease Temporary failure resolving 'mirrors.aliyun.com'
W: Failed to fetch http://mirrors.aliyun.com/ubuntu/dists/jammy-backports/InRelease Temporary failure resolving 'mirrors.aliyun.com'
W: Some index files failed to download. They have been ignored, or old ones used instead.
则说明没有设置DNS,打开/etc/resolv.conf配置域名解析服务器即可,如下是可供选择的域名解析服务器
阿里云DNS:
223.5.5.5
223.6.6.6

腾讯云DNS:
119.29.29.29
182.254.116.116

百度DNS:
180.76.76.76

中国电信DNS:
114.114.114.114
114.114.115.115

中国联通DNS:
123.125.81.6
140.207.198.6

中国移动DNS:
211.9.0.0
114.114.114.114
设置并保存好后,再来执行apt-get update命令。
2. 安装显卡驱动
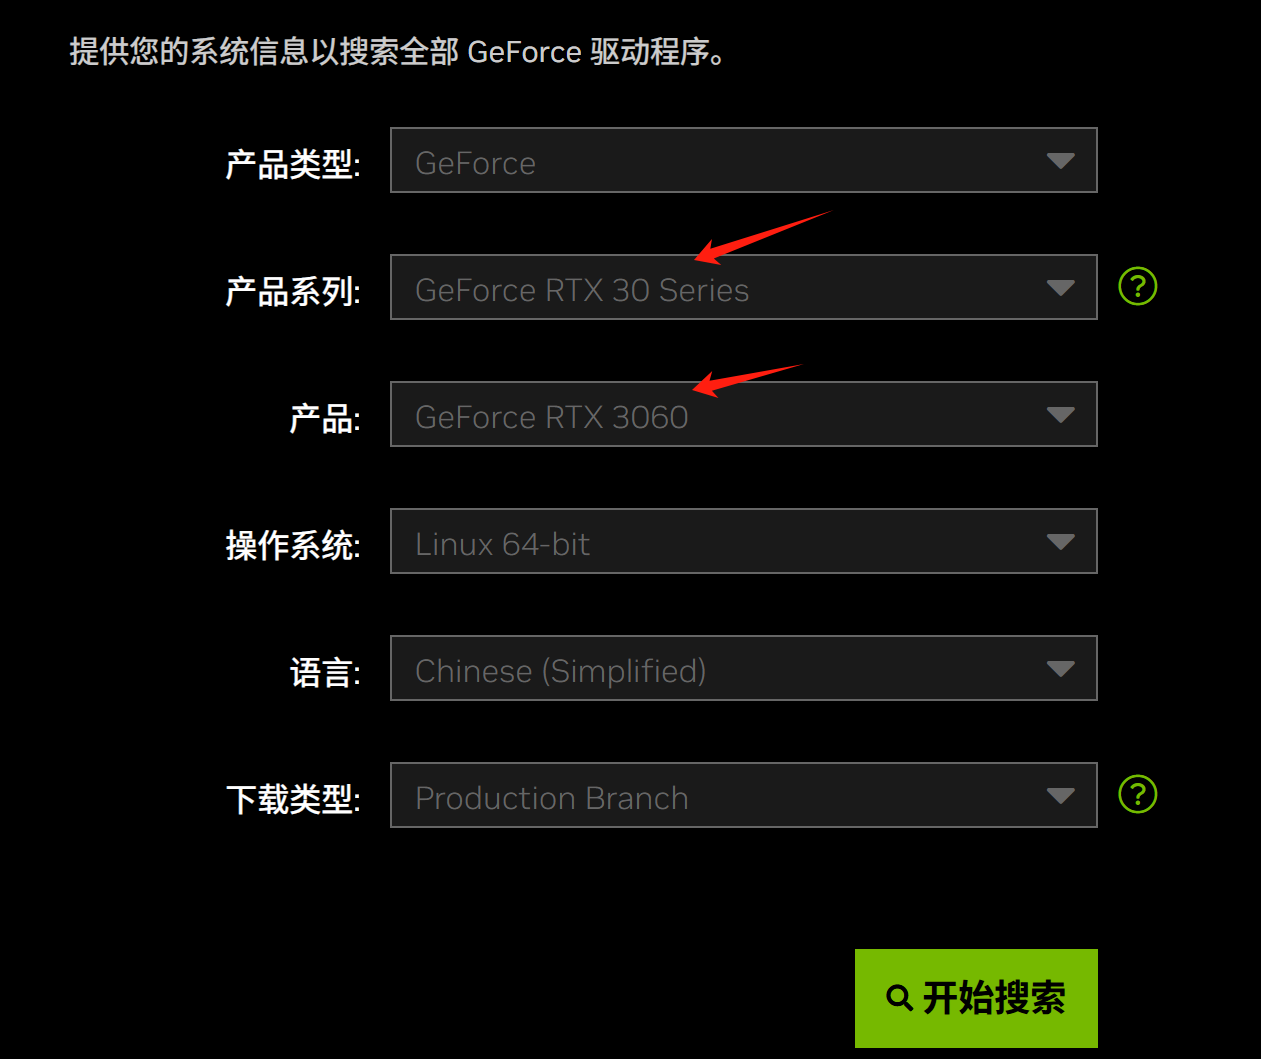
搜索找到对应版本的显卡驱动,可以当英伟达官方中搜索。
我这里的显卡是RTX3060,找到对应的显卡驱动。
如果你还不知道你目前使用的显卡型号,可以使用下面的命令查看。
lspci -v | grep -i "VGA"
然后搜索这个型号的显卡,如下图所示。

然后点击搜索出来的结果,会跳转到另外一个页面,然后点击"立即下载"。当然如果你想要直接在服务器中下载也可以,我们复制下载地址,然后到服务器中使用下面命令下载。
wget https://cn.download.nvidia.com/XFree86/Linux-x86_64/550.127.05/NVIDIA-Linux-x86_64-550.127.05.run
下载完成后,我们需要添加执行权限。
chmod +x NVIDIA-Linux-x86_64-550.127.05.run
运行
./NVIDIA-Linux-x86_64-550.127.05.run
如果运行时提示缺少gcc,那么可以执行下面命令。
apt install build-essential
卸载系统自带的显卡驱动。
sudo apt purge nvidia*
禁用nouveau。
vim /etc/modprobe.d/blacklist.conf
在末尾添加下面语句。
blacklist nouveau
options nouveau modeset=0
然后保存退出之后要记得执行下面命令。
update-initramfs -u
解释:initramfs是一个位于内存中的临时文件系统,在系统启动时用于加载硬件驱动和内核模块,为正式的根文件系统的加载做准备。
然后记得重启一下服务器。
init 6
然后查看一下是否禁用成功。如果没有输出内容,说明禁用成功。
lsmod | grep nouveau
最后我们在回来执行下面的命令,进行安装显卡驱动。
./NVIDIA-Linux-x86_64-550.127.05.run
在这个过程中会有几个提示,你需要根据自己的情况来选择。
最后我们查看一下是否安装成功。
nvidia-smi

补充:我们也可以使用下面的命令来安装。
./NVIDIA-Linux-x86_64-550.127.05.run -no-x-check -no-nouveau-check -no-opengl-files
3. 安装CUDA
从上一步的截图可以看出,显卡驱动最高支持CUDA版本为12.4。
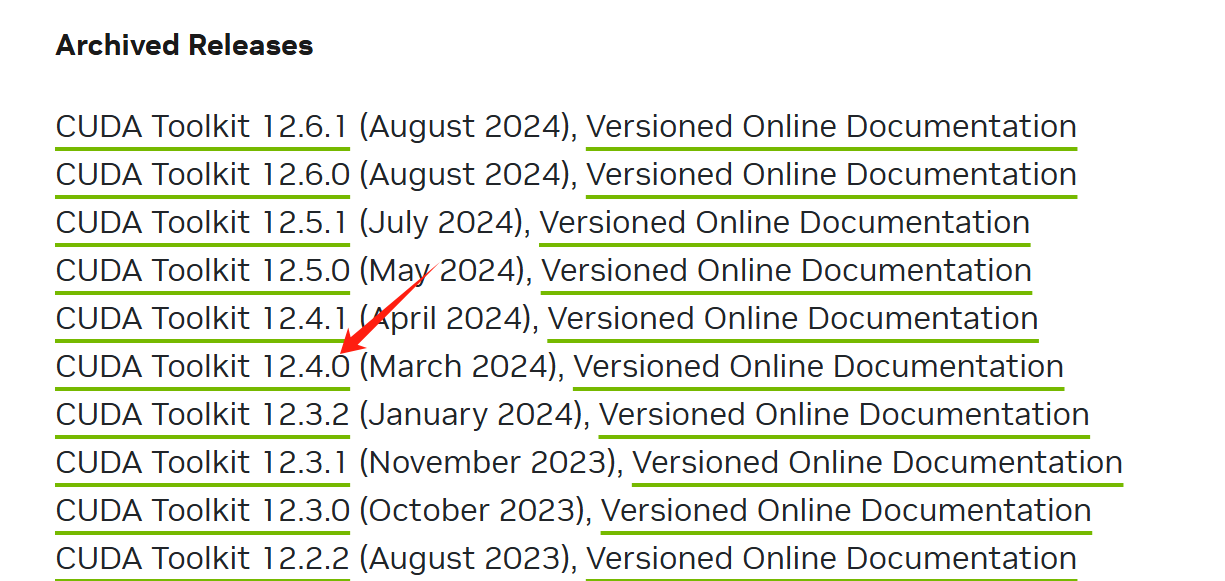
现在我们来安装一下CUDA吧,首先点击这里,跳转到官方页面,然后选择自己显卡支持的CUDA,如下所示。

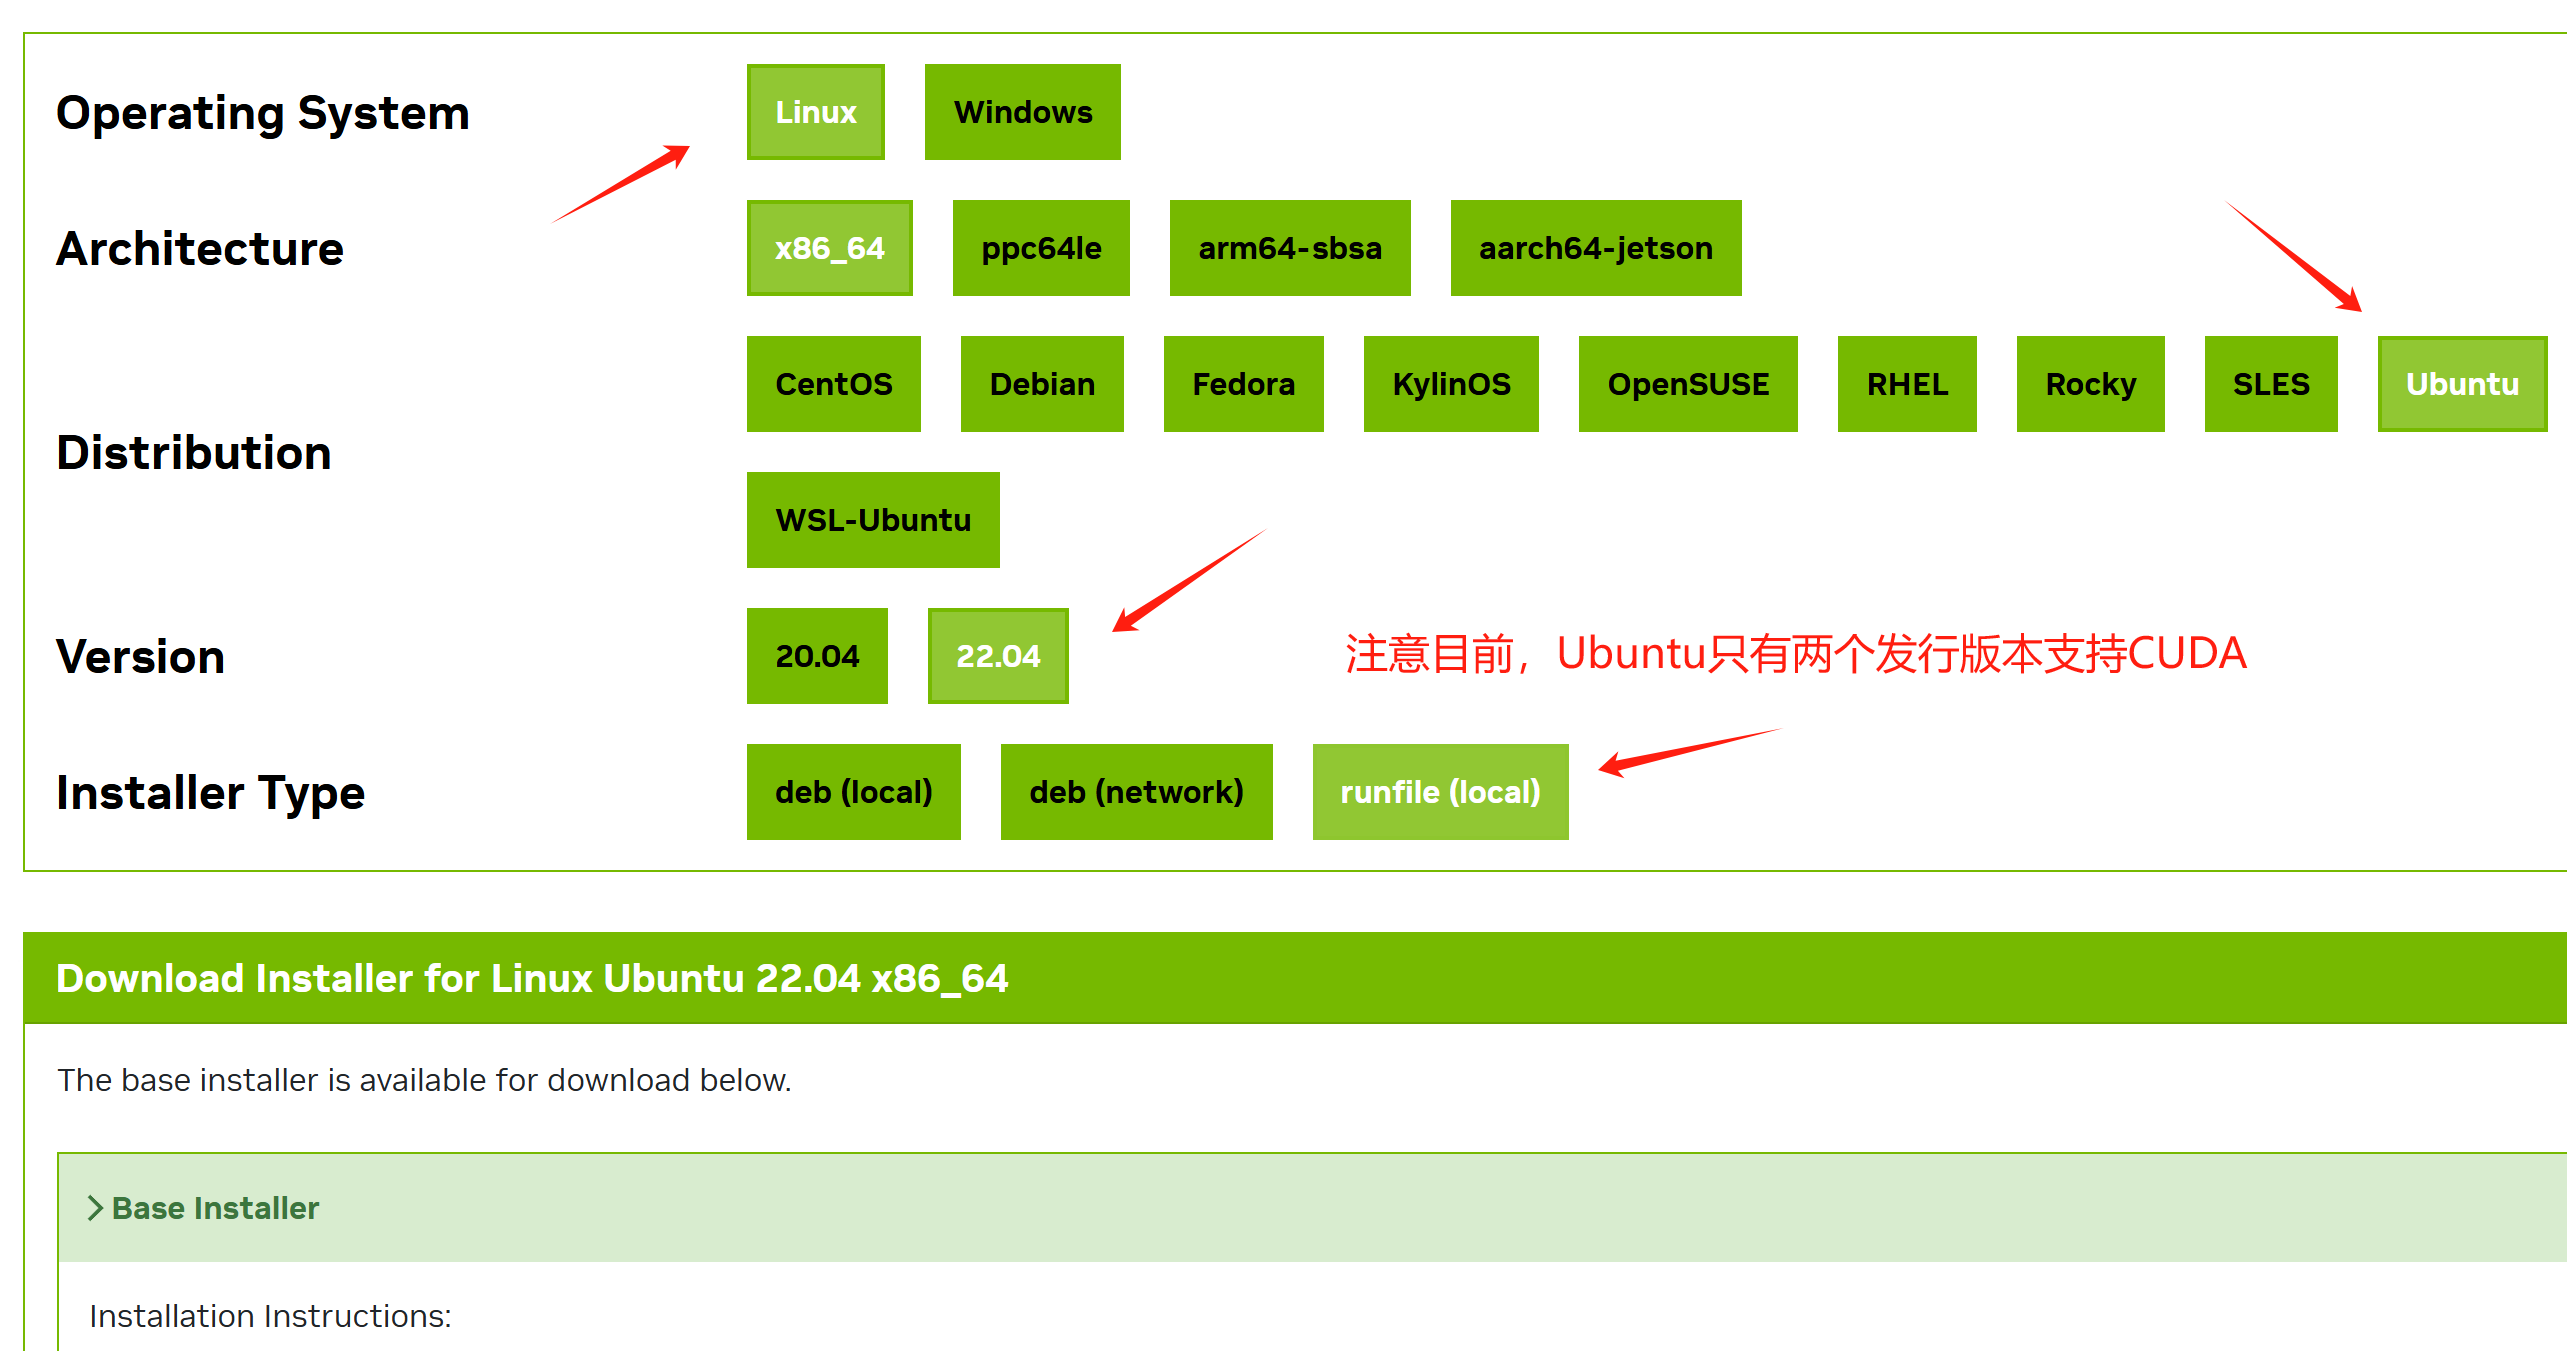
然后选择操作系统,如下图所示。

复制下载命令到服务器中执行。
wget https://developer.download.nvidia.com/compute/cuda/12.4.0/local_installers/cuda_12.4.0_550.54.14_linux.run
chmod +x cuda_12.4.0_550.54.14_linux.run
./cuda_12.4.0_550.54.14_linux.run
在弹窗中输入accept,然后进入下面的弹窗,提示要安装哪些内容,这里把Driver去掉。

当看到如下所示的图,说明安装成功。

配置环境变量
vim ~/.bashrc
# 在末尾添加下面两行内容
export PATH=/usr/local/cuda-12.4/bin${PATH:+:${PATH}}
export LD_LIBRARY_PATH=/usr/local/cuda-12.4/lib64${LD_LIBRARY_PATH:+:${LD_LIBRARY_PATH}}
# 配置好保存后,要执行下面命令
source ~/.bashrc
输入nvcc -V,当可以看到CUDA版本信息说明配置正确,如下图所示。

4. 安装cuDNN
去到官方网站中。
https://developer.nvidia.com/rdp/cudnn-download
根据自己的操作系统选择符合版本的cuDNN下载。
wget https://developer.download.nvidia.com/compute/cudnn/9.5.1/local_installers/cudnn-local-repo-ubuntu2204-9.5.1_1.0-1_amd64.deb
chmod +x cudnn-local-repo-ubuntu2204-9.5.1_1.0-1_amd64.deb
sudo dpkg -i cudnn-local-repo-ubuntu2204-9.5.1_1.0-1_amd64.deb
sudo cp /var/cudnn-local-repo-ubuntu2204-9.5.1/cudnn-*-keyring.gpg /usr/share/keyrings/
sudo apt-get update
# 根据 cuda 版本选择执行哪一个
# cuda 11
sudo apt-get -y install cudnn-cuda-11
# cuda 12
sudo apt-get -y install cudnn-cuda-12
测试cuDNN。
官方文档。
https://docs.nvidia.com/deeplearning/cudnn/latest/installation/linux.html#verifying-the-install-on-linux
安装测试用例。
sudo apt-get -y install libcudnn9-samples

把/usr/src/cudnn_samples_v9复制到有执行权限的任意路径中。
cp /usr/src/cudnn_samples_v9 /usr/local/src/cudnn/test
进入
cd /usr/src/cudnn_samples_v9/mnistCUDNN
编译
make clean && make
在编译时,你可能会看到下面报错信息。
test.c:1:10: fatal error: FreeImage.h: No such file or directory
    1 | #include "FreeImage.h"

我们需要执行安装一下下面的系统依赖。参考文章
sudo apt-get install libfreeimage3 libfreeimage-dev
然后再重新编译
make clean && make
运行
./mnistCUDNN
当看到打印下面内容时,说明cuDNN可用。
Test passed!

参考文章
[1] ubuntu22.04安装显卡驱动+cuda+cudnn
[2] 编译mnistCUDNN时出错:fatal error: FreeImage.h: No such file or directory
[3] 英伟达官方cuDNN说明文档
Q.E.D.


